RESPONSUM allows you to setup automated phishing campaigns that will deliver simulated phishing emails to your selected user targets over time.
See it in action
Pre-requisites to Get Started
Before creating learning schedules, make sure you have the following in place:
- Access as power or promoted user with editor rights to Awareness >> Phishing simulations sub-modules. (Phishing campaigns & Phishing attempts)
- Our services safelisted so that the phishing simulation emails are delivered in the users inbox. You can find the guide on that here for Microsoft and Google Workspace.
- A user group (Smart of manual) with participants to which the scheduled campaign can send out phishing simulation emails (Targets)
Fast-track to Brilliance
- Navigate to Awareness >> Phishing simulations >> Campaigns
- Create a new Campaign
- Fill out the requested details on the campaign page (See Step-by-Step Guidance below for more info on the fields)
- Once the campaign is saved and enabled, the AI will start generating “Templates” and setup “Phishing attempts” which will be randomly within the set time interval will be distributed over the selected user targets.
Step-by-Step Guidance
NOTE: RESPONSUM uses generative AI to generate phishing mail templates and landing page templates. In no way is any data related to the company or targets (users) provided to the AI. The AI generates templates with placeholders that are later filled out with the actual data by RESPONSUM.
NOTE: When a campaign is “Enabled”, you can disable any future emails by editing the campaign and setting this parameter to “No”. This will delete all related “Phishing attempts” (emails going out to targets)
Phishing campaigns can be setup in RESPONSUM to setup an automated flow of phishing emails to a pre-defined set of target users. When a campaign is started, RESPONSUM will schedule based on the set interval emails to users at random times within that interval. (Ex. Monthly campaign will make that some targets get the email early in the month, others later). Next to that, each user under this campaign will receive a different generated email template. This implemented way of working is to prevent the campaign being “Spoiled” by a target who figured out it was a phishing test and let the team know.
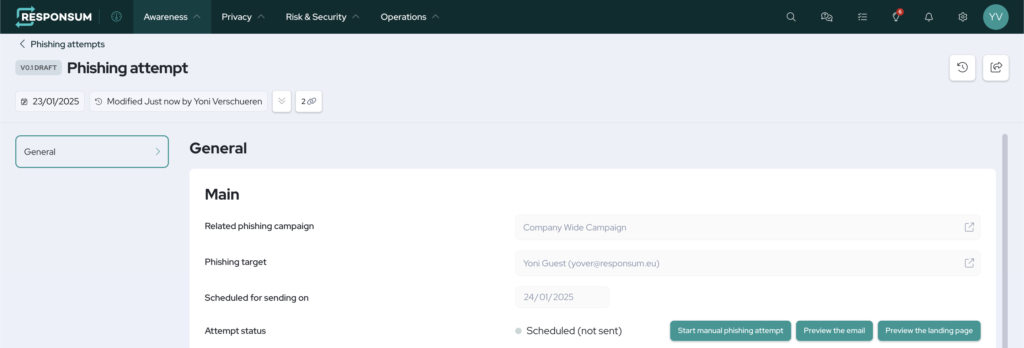
When a campaign is scheduled, you can track it’s results on the campaign page or by navigating to the related Phishing attempts. The phishing attempts represent specific emails scheduled or already sent out to a specific target providing a specific email and/or landing page template.
A detailed description below on how to setup a campaign to run automatically:
- Navigate to Awareness >> Phishing simulations >> Campaigns
- Create a new Campaign
- Fill out the following details:
- Name: To easily identify it later
- User groups: One or more groups of users you want to “Target” with this campaign
- Enabled: Select “Yes” to turn on the campaign
- Frequency: Determine how often we should send each target a simulated phishing email
- Avoid sending campaigns during the weekend?: Choose whether emails can be scheduled for sending on weekend days.
- Archive previous campaign results after (Weeks): Choose for how many weeks the campaign results get stored before they are archived (Can still be viewed)
- Delete previous campaign results after (Weeks): Choose for how many weeks the campaign results get stored before they are fully deleted (Irreversible)
- Campaign Type: Define if the campaign should contain:
- “Only a training page”: Clicking the link will direct you immediately to a “You have been phished” page
- “Landing & Training page”: You will first be directed to a page where you need to interact with (Ex. a login page) before after submitting data being directed to a “You have been phished” page
- Training(s) to provide after being phished: Selection of “Training materials” you want to provide to the users after they interacted with the phishing email (Clicked link OR Submitted data). This will generate “Trainings” for the specific users and selected “Training materials”
- Accountable user for this training: Select the user who will follow-up the assigned “Trainings” for the user.
- To be completed in (Days): Amount of days before the deadline of the “Training” completion.
- Campaign personalization data section: Allows you to select what properties for email personalization the AI needs to foresee in the campaign (Email). The AI never get’s the actual data behind the parameters selected, it will only put in placeholders for our system to fill out upon sending the email to the target.
- Company personalization data section: Allows you to select what properties of the company the AI needs to foresee in the campaign (Email). The AI never get’s the actual data behind the parameters selected, it will only put in placeholders for our system to fill out upon sending the email to the target.
- Allow use of users in the same organizational unit to pretend mails come from them: This allows you to pretend emails to targets are coming from other targets of the campaign. So it looks like a colleague provided you the email (Their mailadres will be spoofed).
- Select a phishing domain (URL): You can select one of our phishing domains for the link in the email to point to and the landing page (if applicable) to be provided on.
- Additional AI instructions: This textbox allows you to next to the default AI instructions we provide to input some more “Rules” that the AI should keep in mind when generating the campaign templates. Think about general campaign theme, if the email can be informal…
- Once the campaign is saved and enabled, the AI will start generating “Templates” and setup “Phishing attempts”
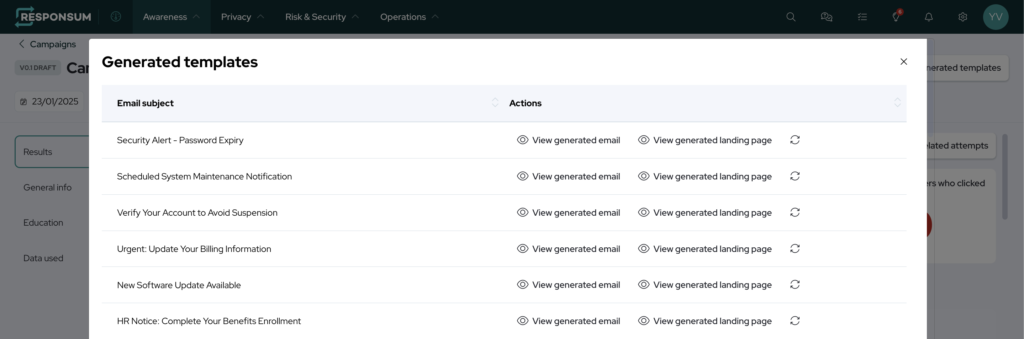
- Templates: Refers to Emails and landing pages generated by AI for you campaign. From the campaign page you can reference the related templates by pressing “View generated templates” in the top right. This will show you an overview of all templates generated for the campaign and allows you to view the Email and/or Training page along with the option to “Re-generate” the template if you do not like the current one. The AI will attempt to generate a new template in it’s place.
- Phishing attempts: Links a generated Template and a specific target under the campaign together. You can navigate to it from the campaign page using the “View related attempts” button. It shows what email will be provided to what target and on what date. You can here also get a preview of the Email template and Landing page template along with the option to send out the email immediately. Alongside, it also shows specific results for one specific target. (Last time the link was clicked, time data was submitted etc.)
You now have a running campaign of which the “Phishing attempts” will be launched on their set “Launch date” to the various target users selected.
If you have any questions related this guide or way of working, please reach out to support@responsum.eu for assistance.